
The Introduction: The Physics of Desperation
In the modern specialty coffee landscape, the absence of a grinder is not a lifestyle choice; it is a situational crisis an infrastructure failure often referred to as “Grinder Lag” or the “Hotel Paradox.” When you search how to grind coffee beans without specialized hardware, you are attempting to solve a complex physics problem with blunt instruments.
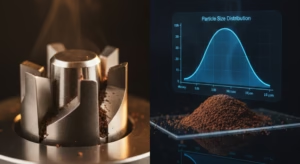
The core enemy in this scenario is the Consistency Crisis, technically known as a bimodal particle size distribution (PSD). A quality burr grinder produces uniform particles that extract at the same rate. Emergency methods, conversely, produce two distinct populations in the same batch:
- “Boulders” (Large Chunks): These under-extract, contributing sour, acidic, and weak notes.
- “Fines” (Coffee Dust): These over-extract almost instantly, contributing harsh bitterness and astringency.
The result is a cup that defies the logic of controlled brewing: it is simultaneously sour and bitter. This guide provides a tactical analysis of how to mitigate this “flavor gap” when specialized equipment is unavailable.
The Tier List: An Analyst’s Ranking
Based on fracture mechanics, heat generation, and particle consistency, I have ranked the most common improvised methods from “S-Tier” (Viable) to “F-Tier” (Destructive).
S-Tier: The Mortar and Pestle
The only method that allows for true particle control.
While physically laborious, the mortar and pestle relies on compression and attrition rather than high-velocity impact. This allows the user to monitor the “Emergency Texture” visually and tactilely, stopping before the beans turn into powder. It is the “purest” makeshift method because it avoids heat generation.
Pros: Low heat transfer (preserves aromatics); negligible cleanup; allows for a medium-fine grind suitable for Aeropress or Pour-over.
Cons: High physical effort (5–10 minutes per dose); capacity is limited to small batches.
Barista’s Verdict: The only method that produces a grind capable of mimicking a lower-end burr grinder. If you have the arm strength, this is your best option.
A-Tier: The Rolling Pin & Heavy-Duty Bag
The preferred solution for the “Hotel Paradox.”
If you are wondering how to grind coffee beans without a grinder while traveling, this is the industry-standard recommendation. This method applies compressive force to crush the beans. By using a slow, deliberate rolling motion, you achieve a “flaked” particle profile rather than a shattered one.
Pros: Zero heat damage; relatively uniform coarse grind; keeps the kitchen clean (if the bag holds).
Cons: Risk of bag rupture (the “Cleanup Struggle”); difficult to achieve anything finer than coarse salt.
Barista’s Verdict: Excellent for French Press or Cold Brew. Ensure you use a freezer-grade Ziploc bag and remove all air before crushing to prevent “boulders and shrapnel” from tearing the plastic.
C-Tier: The Blender / NutriBullet
High risk of thermal degradation and fines.
The most common question in amateur forums is: can you grind coffee beans in a blender? The technical answer is yes, but at a cost. Blenders use high-velocity impact to shatter beans. This creates a massive amount of coffee dust and generates significant friction heat, which can cook the oils and strip volatile aromatics before brewing even begins (the “scorched” flavor profile).
Pros: Fast; minimal physical effort.
Cons: Extreme bimodal distribution (dust and rocks); high risk of the “Onion Effect” (cross-contamination from previous savory foods); heat damage.
Barista’s Verdict: Use only if necessary. Crucial SOP: Do not run continuously. Use the **Pulse Technique**: short 1-second bursts with a shake in between to redistribute the beans. Stop before the motor heats up.
F-Tier: The Hammer
Mechanical chaos.
Striking beans with a hammer relies on impulse force. It is violent, inaccurate, and dangerous to your kitchen infrastructure. Analysis shows this method produces the highest volume of boulders and poses a genuine risk to countertops.
Pros: Cathartic.
Cons: Destroys countertops; high risk of bag rupture; absolutely zero particle uniformity.
Barista’s Verdict: Avoid. This is not grinding; it is smashing. You are better off buying pre-ground coffee or instant coffee than risking your granite countertops for a sour cup of mud.
Technical Troubleshooting: Extraction Management
If you are forced to use an improvised grind, you must alter your brewing parameters to compensate for the inconsistent PSD. You cannot brew as if you have a burr grinder.
The “Immersion” Strategy
Avoid percolation methods like V60 or Espresso, which rely on the coffee bed to regulate flow. Water will channel through the “boulders” and choke on the “fines.” Instead, use full immersion methods like the French Press or Cold Brew.
The “Sieve and Sort” Protocol
If you have a mesh kitchen strainer, sift your grounds. Discard the “boulders” caught in the net and use the relatively uniform material that falls through. This creates waste but saves flavor.
French Press Adjustment
When asking how much coffee for french press using emergency grounds, stick to a standard ratio (1:15), but alter your time and temperature:
1. Lower Temperature: Brew at 80°C (176°F). This lower thermal energy reduces the extraction of bitter compounds from the inevitable “fines” (dust).
2. Extend Time: Steep for 6–8 minutes (longer than the standard 4). This allows the “boulders” time to extract fully, balancing the sourness, while the low temperature keeps the fines from ruining the cup.
Conclusion
While the Mortar and Pestle (S-Tier) or Rolling Pin (A-Tier) can produce a drinkable cup in a “Grinder Lag” scenario, they remain damage control strategies. They physically break the bean, but they do not respect its cellular structure.
These methods preserve the caffeine, but they often sacrifice the nuance of specialty beans. As a professional recommendation: utilize these hacks to survive the morning, but prioritize the acquisition of a burr grinder to respect the agricultural product in your cup.